Thursday, June 30, 2011

Hua Mulan

I love stories with strong female leads...

I also love fairy tales, although I prefer my princesses to be, as I said before, STRONG. 

Maybe that is why I am so drawn to the story a Hua Mulan. 


Now I am sure you have heard the Disney version of the story, but the Ballad of Mulan is equally beautiful, if not more so. I love this link because it has the characters, the pinyin, the direct translation, AND the poetic translation of the song. I have yet to find the music for the song. 

I also love fairytale retellings. The Once Upon a Time series is a collection of fabulous books, written by assorted authors, that all are based on a fairy tale. 


Recently, I jut finished reading, this one, Wild Orchid. I’m sure you don’t need me to tell you, that one is a retelling of Mulan

This book was extremely addicting, I was swept away by just the first page of it. Everything about was just my style, not to mention the extremely attractive male characters...


It was also very inspiring, since it was about finding yourself. The message was positive,as well as thought provocative. 


Author: Cameron Dokey
Pages: 224
Genre: Fairy Tale/ Historical Fiction
My opinon: I really enjoyed escaping to ancient China. This book was entertainingand exciting.I couldn't put it down, I was hooked. 

This book also reminded me of another book  I have read. 


This book was also about a female warrior, and shared very similar concepts to Wild Orchid. But, it was also very different. It you like stories about strong women, this is a book for you! 

Author: Dori Jones Yang
Pages: 352
Genre: Historical Fiction
My opinon: As I said before, I loved this book. It was inspiring,and amazing. Very romantic, and it made you think

Happy Reading!!!

Lots of Love,

Rapunzel


Tuesday, June 28, 2011

Palace of Mirrors


Cecilia is a girl who has been told her whole life that she is a princess. Every night she sits up late studding all the things that she needs to know to become a princess. But, as every fairy tail goes, there is a twist in her fate, and everything she thought she knew changes. Now, it is up to her to make choices that only the true princess could.

Author: Margret Peterson Haddix
Pages: 320
Genre: Fairy Tale 
My opinon: As you will learn, I am not a picky reader. This book delivered what I wanted. It was romantic and funny. It is the perfect ticket-out-of-your-life kind of read. 

Lots of Love,

Rapunzel 

Saturday, June 18, 2011

Day Camp Fun


Because Pascal and I like to pretend, I created an imaginary summer camp for him to attend, and I thought that you might like to hear about it!


In this booklet, there are a series of badges on the final page. These badges are to be colored in as you earn them. Here are the instructions to earning those badges.


Music Badge-  We earned this badge by singing camp songs. These can be any simple children's songs that you know, the choice is up to you!


Picnic Badge- We earned this badge by, well, having a picnic!!! We spread a blanket out on the grass (yes, we left the tower!), and ate camp fire mix.


How to make campfire mix: Mix marshmallowsgram crackers, and chocolate ships together in a bag. Enjoy!


Astronomy Badge- To earn this badge, we read Fancy Nancy sees Stars


This book is super cute, and after we read it, we created our own constellations.


Toilet Paper Roll Constellations:


Supplies:


-Toilet Paper Roll
-Dark Blue or Black Tissue Paper
-Rubber Band
-Pin


Instructions:


1. Cut the tissue paper into two 4" by 4" squares. I had one light blue square and one dark blue square.
2. Cover 
one end of the toilet paper roll with both sheets of the tissue paper. Secure with rubber band.
3. Punch a design in the tissue paper with the pin. You can do your initials, or any other design your heart desires. You want enough dots that light shines through, but don't put them too close together.
4. Now hold it up to the sky, and you can see stars what ever time of day you want!


Nature Walk Badge- This is a simple nature walk that can easily be done in your neighborhood or even the back yard. It is included in the camp booklet. Along with that, we read Fancy Nancy Poison Ivy Expert. (Yes we like Fancy Nancy!)


Arts and Crafts Badge- This is a craft project that can be done with objects found in the world around you! On your nature walk collect leaves, flowers, and other interesting things that you might come across. Use glue to attach these items on a piece of paper, and then add to the picture with crayons. Family Fun Magazine suggests creating fairies. 

Animal Badge: The pages for this activity are located in the camp booklet. We talked about different animals that are found around the world. We also created our own animals. For this activity pick any fun book that has to do with animals, I don't have any fabulous suggestions.

Hope you enjoy!

Lots of Love,

Rapunzel 

P.S. To assemble the book, cut the pages in half, and staple them together. The books will come soon!


Friday, June 17, 2011

Homemade Oreos


Nothing is better than a warm gooey cookie out of your oven. Not only do they taste fabulous, but baking fills your home, or tower, with an amazing smell. Here is a fun cookie recipe  that I am pretty certain you will enjoy.


Chocolate Cookies 
I found this recipe on All Recipes, and I changed it to fit my purposes


Ingredients

  • 4 eggs
  • 2 18.25 ounce packages triple chocolate fudge cake mix 
  • 1 cup vegetable oil


Directions

1. Mix together cake mix, eggs and oil in a large bowl

2. Make little balls with the dough and set on ungreased cookie sheets. ( I put parchment paper on the cookie sheets)

3.Bake at 350 degrees F (175 degrees C) for 4 - 10 minutes.


Peppermint Frosting

1 cube Softened Butter
6 Tbs Milk
4 Tbs Instant Vanilla Pudding
4 c Powdered Sugar
1 Tbs Mint Extract
Red food coloring 

Mix together with an electric Mixer. 


After you have made the cookies and the frosting, you can assemble the Oreo. Put a generous amount of frosting on the backside of one of the cookies, and then stick another cookie on top of it.

yield: 24 Oreos 


Enjoy!


Lots of Love,


Rapunzel 

Wednesday, June 15, 2011

Birthday Card

I love making cards!!!! It is so much fun. It allows you to be as creative as you want.


Here is a fun birthday card, you can print it out, or send it to a friend virtually, the choice is yours!


To personalize it add your own special message! Enjoy! 


Lots of Love,

Rapunzel 

Tuesday, June 14, 2011

Have some very Harry fun!

Being stuck in a tower provides you with a LOT of reading time. 


Trust me, I would know.


So, needless to say, I have read all the Harry Potter books.


And, I , just like any other crazy Harry potter fan, am physicked for the last movie to come out next month. So in honor of the premier, I'm posting some Harry Potter coloring pages from http://www.coloring-book.info! Enjoy!


Year one


More Harry fun to come!!! Enjoy!!!


Lots of Love,


Rapunzel 


Monday, June 13, 2011

Puppets

I love coloring.


A lot.

So, this afternoon, I decided to make puppets! 

I even got Pascal to try it out.

We both agreed that it was a success, and we hope that you will too. 

Supplies

Puppets
Craft Sticks
Masking Tape
Glue sticks
Colored Pencils
Construction Paper, or Card stock


Instructions


Begin by coloring the puppets. Colored Pencils work best, because they can do the little details.


After you have colored them, cut out the character, not the back ground. Glue the character on the construction paper, if you didn't print it out on card stock. 


Do this with all of the puppets. 

Once that is done, carefully cover the puppets in masking tape, and cut them out. You can also laminate them. 

After that, you can stick the stick on the back with masking tape. 


A fun way to create a puppet show is to get some fairy tale stories from the library, and to read them while the small chameleons(or children) in your life act the story out! 

I will be posting the puppets soon, but you can also just use coloring pages you find online. Here is a good website that I used a lot http://princess-coloring-pages.blogspot.com/ .

Lots of Love, 

Rapunzel 


Coming Soon!

What do fire and flowers have in common? Well, more than you might think! And, soon
I intend to tell you! So keep your eyes on my blog!


Lots of Love,

Rapunzel

Thursday, June 9, 2011

Play Dough

This afternoon, Pascal and I decided to make play dough!!!


Pascal is an AMAZING helper, and this project was perfect for his little hands. He held measuring cups for me, and even did a little of the stirring. Yep, I think he is right on his way to be a skilled play dough maker!


He loved it SO much,  that he begged me to share the recipe with  you. 


Play Dough (from my mother's little red cook book)


Stores three months in the fridge


1 cup flour
1 cup water
1 tablespoon oil
1/2 cup salt
2 teaspoon cream of tarter
Food coloring


Mix everything, except for food coloring in a sauce pan on medium heat, until it starts to form a ball. Make sure you wait until most of it forms a ball, or else it will be too sticky.


Kneed the color into the dough on a piece of parchment paper.


To make more than one color, split to dough and kneed the 
different colors into each section. 


Enjoy!


Lots of Love,

Rapunzel

P.S. "Our mind, like the dyer's hands is colored by what they hold"

Tuesday, June 7, 2011

Ribbon Flowers

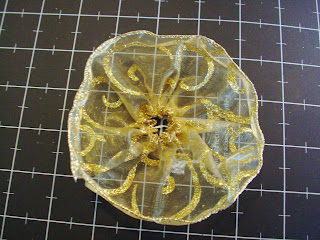
I am a firm believer in flowers. Everything looks better with a flower, no matter how cute it is already! Which is why I have decided to dress this bag up with a ribbon flower.
Before
After


As you can see, it created an amazing affect!  This flower can be used to dress up not only bags, but anything else you can think of. It is fairly simple, and doesn't take too terribly long to make. 

Supplies:
  • 1 piece of ribbon with wire in the sides, 1 1/2 in. wide, 9 1/2 in. long
  • 1 piece of coordinating ribbon with wire in the sides, 2 1/2 in. wide, 12 inches long.
  • 1 coordinating button/ jewel 
  • Coordinating thread
  • Glue stick
  • Hot Glue
  • Ruler 
  • Scissors 
  • Scratch Paper
  • Needle 
Instructions:


1.Begin by measuring your ribbon. You will need to buy two different roles of ribbon, one role that is  1 1/2 in. wide, and one that is 2 1/2 in. wide. Cut a 9 1/2 inch piece from the role that is 1 1/2 in. wide, and a 12 1/2 piece from the role that is 2 1/2 in. wide. The ends should be as straight as you can get them, not cut at an angle. Your flower will have two layers, the long piece will be the bottom layer, while the shorter  piece will make up the bottom layer. *NOTE* If your ribbon is frayed, cut the frayed edges BEFORE you measure your ribbon.
2.Once you have your ribbon measured , smooth the pieces out on your scratch paper. Take the glue stick and carefully dab glue on the raw edges of the ribbon. You don't need a lot, just a little will do.  To this to both sides of each edge of both ribbons. This is to prevent fraying.
3.Next take the smaller piece of ribbon and begin to fold it accordion style. These folds should be around 1/2 in., but they don't need to be perfect. This is where the wire in the edge comes in handy, it will hold your folds in place.

4.Set the folded piece of ribbon down, don't worry the pleats will start to spread apart, but that won't be a problem. Thread the needle with a 6 inch long piece of thread. slide the needle to the middle, and knot both ends together, slip knot style. Pick up the ribbon, and pinch the pleats together, like this:


Then slide the needle through all the pleats, like so:
    Bring the needle around to the beginning, and go through all the pleats again. Cinch the thread fairly tight, but not too tight, because the knot will pull through the ribbon if you do. Tie a knot under the needle, and cut of the needle, leaving the knot to keep the flowers shape.
    5. Fan the flower out, so that it is as circular as can be. To get the raw edges stay together, put a small drop of hot glue at the top edge of the ribbon,and stick the two corners together. 
    6. Repeat steps 3-5, with the larger piece of ribbon, with the following changes.
    -When you create the folds, make them 1/4  inch wide.
    -Your piece of thread needs to be 8 in. 
    8. Place the bigger flower on the  table with the front side facing up. Flip the edges up, so you have created a bowl like shape. 

9. Use hot glue to secure the smaller flower in the center of the larger flower.


10. If you would like a button/jewel in the center of your flower, put a dab of hot glue on the back of the button and secure it in the center of the flower.

Now you can hot glue it on to anything you like!

Lots of Love,

Rapunzel


    Monday, June 6, 2011

    Under Construction

    This blog is still in the making!!!! But, I have a LOT of fun planed, and I hope you will come back soon!


    Lots of Love,

    Rapunzel