 |
| Before |
 |
| After |
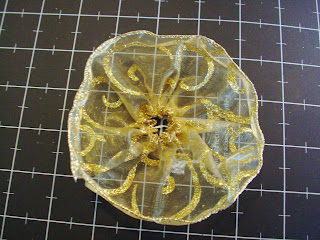
As you can see, it created an amazing affect! This flower can be used to dress up not only bags, but anything else you can think of. It is fairly simple, and doesn't take too terribly long to make.
Supplies:
- 1 piece of ribbon with wire in the sides, 1 1/2 in. wide, 9 1/2 in. long
- 1 piece of coordinating ribbon with wire in the sides, 2 1/2 in. wide, 12 inches long.
- 1 coordinating button/ jewel
- Coordinating thread
- Glue stick
- Hot Glue
- Ruler
- Scissors
- Scratch Paper
- Needle
Instructions:
2.Once you have your ribbon measured , smooth the pieces out on your scratch paper. Take the glue stick and carefully dab glue on the raw edges of the ribbon. You don't need a lot, just a little will do. To this to both sides of each edge of both ribbons. This is to prevent fraying.
3.Next take the smaller piece of ribbon and begin to fold it accordion style. These folds should be around 1/2 in., but they don't need to be perfect. This is where the wire in the edge comes in handy, it will hold your folds in place.
4.Set the folded piece of ribbon down, don't worry the pleats will start to spread apart, but that won't be a problem. Thread the needle with a 6 inch long piece of thread. slide the needle to the middle, and knot both ends together, slip knot style. Pick up the ribbon, and pinch the pleats together, like this:
Then slide the needle through all the pleats, like so:
- Bring the needle around to the beginning, and go through all the pleats again. Cinch the thread fairly tight, but not too tight, because the knot will pull through the ribbon if you do. Tie a knot under the needle, and cut of the needle, leaving the knot to keep the flowers shape.
- 5. Fan the flower out, so that it is as circular as can be. To get the raw edges stay together, put a small drop of hot glue at the top edge of the ribbon,and stick the two corners together.
- 6. Repeat steps 3-5, with the larger piece of ribbon, with the following changes.
- -When you create the folds, make them 1/4 inch wide.
- -Your piece of thread needs to be 8 in.
- 8. Place the bigger flower on the table with the front side facing up. Flip the edges up, so you have created a bowl like shape.
9. Use hot glue to secure the smaller flower in the center of the larger flower.
10. If you would like a button/jewel in the center of your flower, put a dab of hot glue on the back of the button and secure it in the center of the flower.
Now you can hot glue it on to anything you like!
Lots of Love,
Rapunzel


No comments:
Post a Comment